How and Why to run your own Bitcoin Mining Node/Pool at Home!

Hey crypto miners! Welcome back to the blog. If you’ve ever wondered, “Should I bother running my own Bitcoin node at home?” or “What’s the point when I’m already solo mining through pools?” — this post is 100% for you. I finally took the plunge into setting up my own home Bitcoin node, and honestly, it’s way easier than you might think.
We’re going step-by-step through why you’d want to do this, what gear you need, and exactly how to get your node fired up with Umbrel. Plus, I’ll show you how to connect your solo mining ASICs for quicker, fee-free, decentralized mining. Ready? Let’s dig in.
For more insights on this topic check out this detailed video: Stop Mining Bitcoin to Solo Pools! Here’s Why!
Table of Contents
- Why Run Your Own Bitcoin Node?
- Hardware and Costs: What You Need
- The Umbrel Guide: Quick & Painless Setup
- Inside The Mining Shed: My Bitcoin Solo Mining Setup
- The Full Step-By-Step Installation
- Umbrel Dashboard: Installing the Bitcoin Node
- Adding Public Pool: Your Local Solo Mining Pool
- Connecting ASIC Miners: Pool and Node Integration
- Performance, Storage, and Tips
- FAQ: Everything You Need to Know
- Final Thoughts & Resources
Why Run Your Own Bitcoin Node?
So, why go through the trouble of setting up a Bitcoin node at home when you can just point your gear at a pool?
Let’s break it down:
“There’s a lot to be said about the latency between your miner and the actual pool that you’re soloing to. You get a much better edge when latency drops, especially around the mempool and new transactions.”
Main Reasons
- Better Performance: Lower latency between your miner and node means higher efficiency, faster transaction propagation, and potentially a higher edge on winning blocks.
- No Pool Fees: Pools take a cut when you hit a block — with your own node/pool, if you solo mine a block, you keep it all!
- Decentralization: You’re contributing to the Bitcoin network’s privacy and security by running your own node.
- Control: You track your transactions, know everything is verified, and you’re not trusting third-party nodes for your mining activity.
- Privacy: Less sharing of your transaction and mining activity data with external parties.
Hardware and Costs: What You Need
You don’t need to spend a fortune to get started (unless you just want an excuse for new gear).
My Shopping List
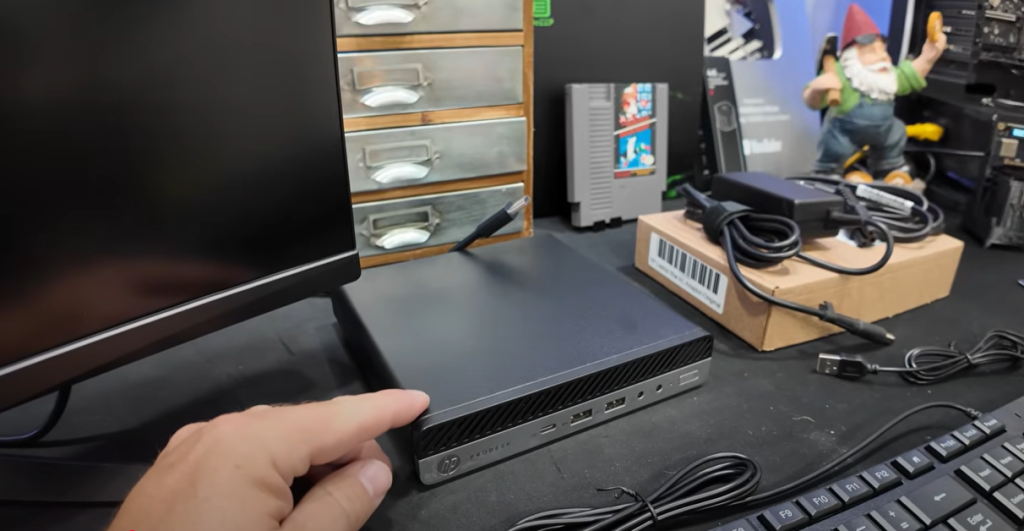
- Mini PC: Picked up an HP ProDesk (i5 6500T, 16GB RAM, 256GB SSD) renewed for $120.
- NVMe SSD: Got a 2TB stick for $99. Trust me, you’ll want this storage for years of blockchain growth and fast sync.
- Miscellaneous: Keyboard, mouse, monitor — whatever’s nearby or collecting dust.
A lot of us already have something lying around that’ll work. Here’s a quick breakdown:
| Hardware | Minimum | Recommended | My Build |
| CPU | 2-Core | 4-Core+ | I5 6500T |
| Ram | 4GB | 8GB+ | 16GB |
| Storage | 1Tb min | 2TB VNMe | 2TB NVMe |
| Network | Gigabit | Wired | Wired |
| Other | USB | Ethernet | USB for OS, Ethernet Cable |
Total Spent: About $220. Totally possible to do for free with spare parts.
Pro Tip: Don’t skimp on the SSD — the Bitcoin blockchain is big and fast I/O really helps.
The Umbrel Guide: Quick & Painless Setup

If you’re intimidated by Bitcoin Core on Linux or command line, don’t stress. Umbrel makes it plug-and-play.
What is Umbrel?
Umbrel is a free, open-source operating system that lets you run “personal server stuff” with a sweet user interface. With Umbrel, you can literally click “Install” for a Bitcoin node, Lightning node, Mempool explorer, BTC Pay Server, and more.
Umbrel’s Strengths
- Dead simple installation and updates
- Easy GUI for setup, monitoring, and extending features
- Actively developed — lots of tutorials and community support
They also publish clear minimum requirements:
- 64-bit dual-core Intel/AMD
- 4GB RAM (8GB+ preferred)
- 32GB boot SSD + 1TB for chain (just get a 2TB NVMe from the start)
- Ethernet strongly recommended
The Full Step-By-Step Installation
Let’s get into the nitty gritty — but don’t worry, it’s easier than it sounds. Here’s the process from start to finish.
Follow Along with Me in this Video: Stop Mining Bitcoin to Solo Pools! Here’s Why!
1. Preparing Gear & Storage
- Disassemble mini-PC: Slide the back latch open, swap out the default SSD for the new 2TB NVMe – Applies if you bought the same Mini PC as me.
- Find a suitable USB stick: I used an old 16GB server install drive.
2. Flash Umbrel OS to USB
Get Balena Etcher, your handy OS-flashing tool.
- Download the Umbrel OS image.
- Launch Balena Etcher.
- Select the Umbrel OS image (“.img” file).
- Choose your USB stick.
- Hit “Flash.”
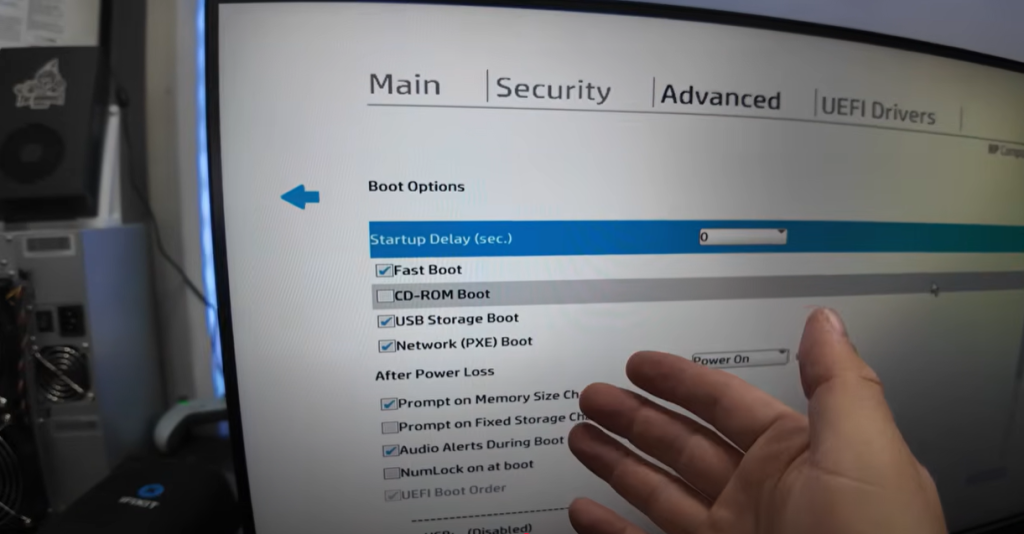
3. Boot and BIOS Tweaks
Plug the flashed USB into your new node/mini pc. Enter the BIOS (usually F10, Del, or Esc at startup).
- Set USB Storage Boot: Ensure booting from USB is enabled.
- Power Loss Settings: Change “after power loss” to always on — so your node comes back automatically after outages.
4. Install Umbrel onto NVMe
Follow the Umbrel installation prompts:
- Boot your PC
- If it doesn’t auto boot to the Umbrel USB, select Boot from USB at the Boot Menu.
- Choose the NVMe as the target
“It took about five minutes, then I got the message: ‘Your Umbrel is accessible at [IP]:8680’.” – The Hobbyist Miner
5. Initial Umbrel Login & Account Setup
Open a browser on another computer on your LAN and visit one of:
- http://umbrel.local or
- http://[your_node_ip]:8680
You’ll see a setup wizard for username/password (stored locally, so remember to back up).
Umbrel Dashboard: Installing the Bitcoin Node

Once you’re in the fancy new GUI:
- Select “Bitcoin Node”: It’ll be one of the featured apps.
- Click “Install”: It works just like adding an app on your phone.
- Let Umbrel handle the magic.
How Long Does It Take?
- Installing the software: A couple minutes.
- Syncing the Blockchain: Could take one to three days depending on your internet and SSD speed. The BTC chain is currently well over 700GB and growing.
“In my case with gigabit fiber, 22 hours to sync — but instructions suggested multiple days, so set expectations accordingly.” – The Hobbyist Miner
Storage & RAM Usage
- My install: ~850GB for initial sync. Umbrel reported 1.15TB free out of 2TB post-sync.
- RAM: 12.7GB used out of 16GB.
- Pro Tip: If you only have 8GB RAM, consider getting more (especially with multiple miners/nodes in use).
Adding Public Pool: Your Local Solo Mining Pool
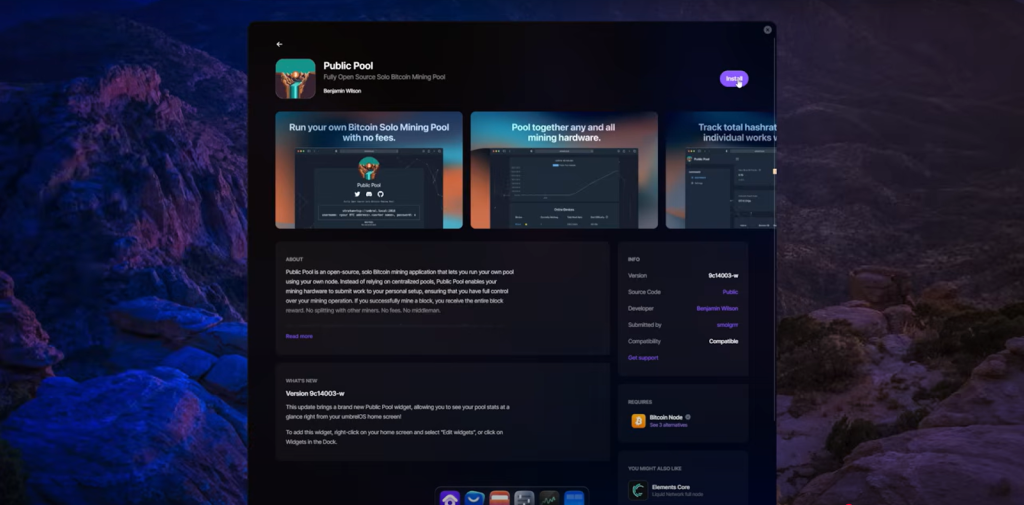
Umbrel does more than just “run the node.” Next step, install a local pool for your ASICs!
Follow Along with Me in this Video: Stop Mining Bitcoin to Solo Pools! Here’s Why!
What’s “Public Pool”?
- Open-source, solo-mining pool server
- Lets you and your gear mine “to yourself,” not to a web pool
- All block rewards are 100% yours
How to Install:
- Go to “App Store” on Umbrel dashboard
- Search for “Public Pool”
- Click Install
Once installed, you’ll get new ports for connecting miners — usually
- BTC Node: Port 2100
- Public Pool: Port 2019 (or 2018 — check your config)
Connecting ASIC Miners: Pool and Node Integration
Time to get your hardware talking to the node!
On Your ASIC Miner
- Find Pool Settings Menu
- Pool URL: Use your home node’s LAN IP and the Public Pool port.
For example:
stratum+tcp://192.168.88.61:2018
Opening the Public Pool App will show you all of this information. - Username: Set to your Bitcoin address + worker name (e.g. bc1qwxyz.worker1)
- Password: x (or whatever you like, Public Pool will accept it)
- Save and restart miner!
Here’s sample config for a miner:
Pool URL: stratum+tcp://192.168.88.61:2018
Username: bc1qyoursoloaddress.yourworker
Password: x
Check back with the Public Pool dashboard — your worker should appear within minutes, and once mining is active your stats will update in real-time.
Performance, Storage, and Tips
Syncing and Storage
- First sync: Could take a day (or more) — plan to keep the node powered and on the net.
- Storage: The chain will grow! 2TB NVMe is room for growth and high speeds.
- RAM: 8GB is fine for most; 16GB covers everything.
- Network: Wired Ethernet highly preferred. Don’t run latency-sensitive workloads over WiFi.
Keeping it Running
- Use a UPS if possible (power cuts can corrupt the database)
- Set “restore on power” in BIOS
- Keep the system in a cool, ventilated spot
Upgrades and Maintenance
- Umbrel handles upgrades and app management from the GUI
- Backups: The node itself is replaceable, but your passwords/wallet & configs are not. Back up accordingly!
FAQ: Everything You Need to Know
1. Do I need fancy hardware?
No. The system requirements are modest. An old desktop, mini PC, or even a Raspberry Pi 4 with 8GB RAM is enough for smaller operations. Fast SSD/NVMe is very strongly recommended.
2. Does my electricity bill go up?
Not significantly for the node—a small PC might use 10–30W. Your mining rigs are the power hogs.
3. How secure is running my own node & pool?
Very, as long as you keep your node updated, patched, and don’t expose it directly to the internet. Only connect on your home LAN.
4. If I hit a block… do I really get it all?
Yup! With your own solo pool and node, there are no third-party pool fees or payouts. The entire block reward minus transaction fees is yours.
5. What about future upgrades?
Umbrel supports atomic (one-click) updates for both the OS and all node apps—super easy.
Final Thoughts & Resources
Honestly, if you’ve ever felt solo mining is “pointless” because of fees, latency, or feeling it’s too complicated — you need to try this. Setting up a home Bitcoin node and pool has never been easier. Umbrel’s slick interface, low requirements, and open-source nature mean anyone can fire this up with just a few hours and spare parts.
“I never realized how easy this was, honestly. You guys can do this!” – The Hobbyist Miner
What Are You Waiting For Crypto Miners?
Happy Mining! Don’t forget to checkback next week for another new article. Released every Monday morning.
Follow along this step by step video, to setup your own home Bitcoin mining node: Stop Mining Bitcoin to Solo Pools! Here’s Why!